Dear players and DXE users,
in anticipation of 4.3 content I’m uniting both branches of DXE (for Apollo 1 and for Apollo 2) into one in the release of version 3.3 – 13.
I also want to take this opportunity to reiterate various special features DXE contains for upcoming raid – Dragon Soul. Now you might be familiar with all of these but if you are not I encourage you to keep reading.
Morchok
Stomps and Crystals
For heroic mode there would normally be a lot of Stomp and Resonating Crystal spam but as the most raids divide players into two groups that take care of their own little boss there is little reason to display warnings for the other and that’s what DXE does. By default it only displays warnings for Stomp and Resonating Crystal for your current target and focus.
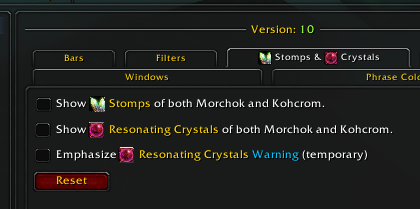
If you happen to want to display both everytime you can either use target for Morchok and focus for Kohkrom (or vice versa) or (if you want to keep your target and/or focus free to use you can use the corresponding option in Advanced settings for Morchok (see the picture).
Warlord Zon’ozz
Disrupting Shadows
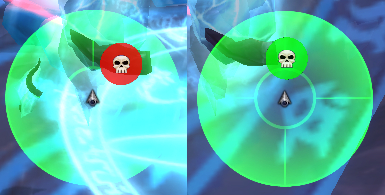
Healers (or rather dispellers) might use the radar circle indicators for Disrupting Shadows.
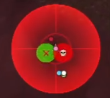
If the circle is red the person with the debuff still needs to move further from other players so they get knocked out and of course when the circle is green they’re good to be dispelled. All around it gives all people a better idea how far one needs to go to be dispelled.
Yor’sahj the Unsleeping
Ooze Priorities
As a part of this boss you need to decide in advance which ooze color you are going to be killing for given combination. Now all the possible combinations are given in advance so we can easily choose but to makes matters easier you can use DXE to do just that using the feature Ooze Priorities.
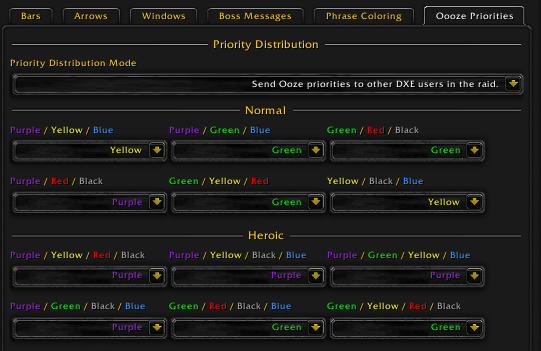
There are 3 distribution modes to basically go:
- Receive Ooze priorities … – goes for every regular raid member
- Send Ooze priorities … – goes for the person that has the Priority Distribution setup (RL or assistant required)
- Trigger Ooze priorities set by you … – you choose you own priorities for yourself
When the dedicated person has these set up, during the encounter you are going to see these:
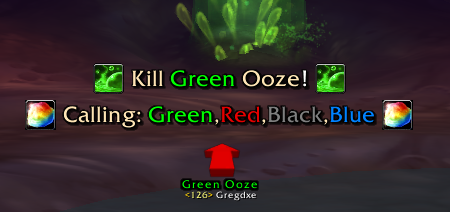
And yes, there are also arrows pointing towards the spawn position for the corresponding Ooze.
What’s important here is that these alert will not only appear for the person who sets them up but for everybody with my version of DXE (if it’s not too low version that is) and should some people use DBM, other stuff or nothing at all, the priorities are also announced using Raid Warnings which are by default hidden for the DXE users (the filter can be turned off in the Yor’sahj’s Advanced settings of course).
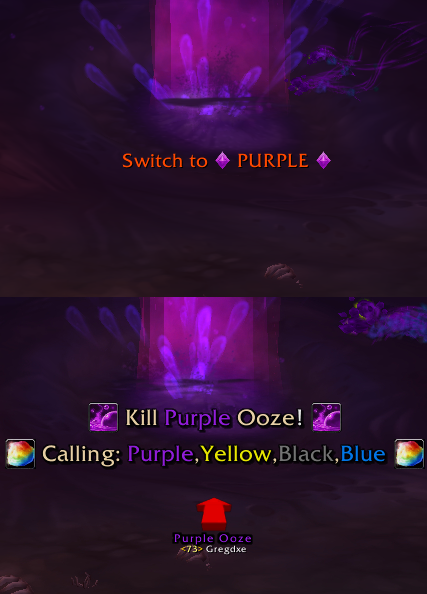
The picture above shows the version without and with DXE. You can decide which one you like better.
You may still call out which one you need to kill but with Ooze Priorities feature you might hardly ever need to.
Ooze Instructions
At first it might be confusing what to do for the remaining combination of Oozes that the boss eats and for that there are Ooze Instructions. These are raid warning texts that tell you what to do with each remaining combination of oozes as soon as you kill one of the oozes or when the boss absorbs them (whichever comes first).

Now I prepared two sets of pre-set instructions in English and in Czech but in the Yor’sahj’s advanced settings you can write your own if you want to take the time. To switch between the pre-set language versions you can use the dedicated buttons but WARNING: This will overwrite your custom messages.
Hagara the Stormbinder
Frostflake
Similarly to Zon’ozz, dispellers can utilize Radar circles here which show where the people with Frostflake are and if they are in the correct spot to dispel the debuff.
To colors of the circle or tied to player being or not being under the effect of Watery Entrenchment (the center dome). Of course the important thing is the combination with raid icons so that you can better identify who to dispel especially on 25-man.
Ultraxion
This fight might be a bit tough to organize because you need to select people to stay and soak the Hour of Twilight casts especially on heroic. For this DXE has Hour of Twilight Priorities feature that helps you with this process.
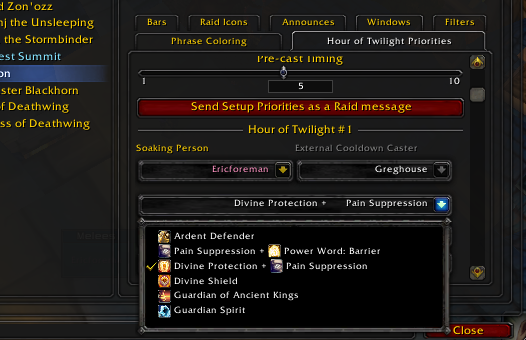
With this feature you can not only choose the individual people to soak the Hour of Twilight for each specific Hour of Twilight cast but you can also select the spell or a combination of spells using which the person is able to survive the Hour of Twilight. Should the second spell be cast by a different person you can also specify which person will it be if there are multiple people that can cast that spell. Now the list of spells and cooldowns is based on the character’s class and role (talents are not scanned). It is so that the displayed cooldowns make more sense and for example healer priest isn’t offered a dispersion to use for Hour of Twilight.
In the picture you can see couple more items such as Pre-cast timing which states how many seconds before the Hour of Twilight cast the priorities for the incoming Hour of Twilight are broadcasted. Now similarly to Yor’sahj the priorities are sent both to raid warning and triggered as alerts for DXE users.


DXE users have Hour of Twilight priorities raid warning filtered so they don’t see them on the screen (only in the chat window) because instead they will be seeing the DXE alerts as seen above should they have any responsibilities for the upcoming Hour of Twilight.
Last but not least there is a Send Setup Priorities button which sends the names of people who soak the hours in the raid chat. Any more specific stuff needs to be addressed between the raid leader and the person soaking the hour.
Warmaster Blackhorn
Twilight Onslaught Priorities
Even though this might be a task for another addon, as a special request in previous versions I added a mechanic similar to Hour of Twilight priorities I called Twilight Onslaught Priorities.
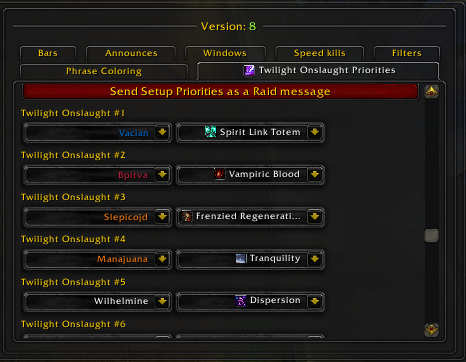
You can use it to select which healing cooldown is going to be used for which Twilight Onslaught and also its caster. That caster will then be notified x second before ther Twilight Onslaught. Easy enough but it’s disabled by default.
Spine of Deathwing
Fiery Grip absorb bar
Only because of Spine I added a new kind of bar that is similar to absorb type bar that you might have seen in 4.1 content. This one has a type of “inflict” and it basically measures the required amount of damage that you need to deal to a specific NPC and in this case it is Corruption tentacles that needs to be damaged after casting Fiery Grip.
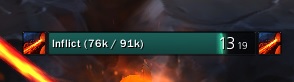
It’s a way of knowing how much more damage needs to be delt to free the person being held.
Searing Plasma healing absorb bar
For 10-man it might be worth using Searing Plasma healing absorb bars that display how much you need to heal to remove the debuff from a player.
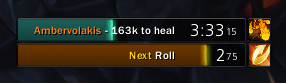
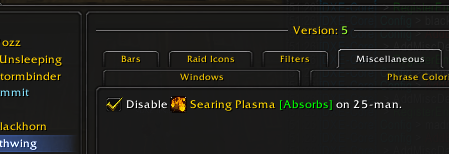
Of course for 25-man with a lot of debuffs going around it is probably better idea to deal with this using a healing addon if you can. This bar is disabled on 25 man unless you enable it.
Madness of Deathwing
Mutated Corruption Radar Lines
Another new feature that you haven’t seen in the modules prior 4.3 are the Radar Lines and its best use case can be shown on Madness of Deathwing encounter. It’s plain and simple drawing lines on the DXE radar but lines have to have a purpose and that purpose is to show where people should not stand.
See, one aspect of the encounter is there is a Mutated Corruption on each platform and it sometimes slams into the ground crushing players in its line of crush. Now this might be a huge concern to healers because the damage can hit multiple people at the same time if they are standing in a line behind each other and healers have to devote extra time and mana to heal them.
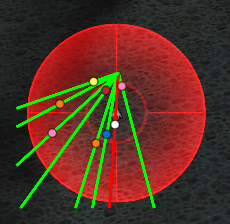
To combat this you should stand spread in a fan-like cone of that you don’t endanger other people by standing too close to them and Crush can’t hit you both.
In the picture above you can see the people’s lines are green of they are alone on the path to the Mutated Corruption. However when there are too many people the line starts turning shades to red. The picture shows 10-man heroic where the limit is 1 person per line (25-man and other difficulties have different limits which can be also customized) that’s why the priest’s line is red because the player taking the picture is standing in his way which is also why the entire radar is red to indicate you the player you’re standing in someone’s path. So if everything’s green then everything’s fine.
WARNING: The detection of Mutated Corruption’s position comes from tank’s position getting hit by it. On most platforms there are 2 possible locations for the corruption to appear. When the tank gets melee hit by the corruption the position closest to the tank is assumed to be the actual location of the corruption. Even though I put limits in place on how close the tank needs to be it sometimes might happen that the incorrect side is indicated as the origin place for the corruption. In that case you can still correct it by coming closer to the actual corruption entering the area drawn on the radar with circles that indicate where the corruption location is going to be detected for each corruption. Beware though that the time to correct this mistake is only until the first Impale after which the location is locked and won’t be changed. The locking frees up the tank to be able to move more without affecting the feature any further.
Conclusion
I see quite a lot of you have started using DXE and it would be nice to hear your impressions DXE gives you. Exluding some rare instances during the last year I feel like I’ve been acting a play for a full audience of people whose faces I can’t see, and whose claps or boos I can’t hear.
The audience might as well be empty…